Friday, December 25, 2009

2nd Annual Cookie Exchange

Oh Lord have mercy--it only took me two weeks, but I am finally posting about our wonderfully fantastic cookie exchange of December 11. I have been off of work this past week and, whenever I'm not working, time kind of stops. That is, I have so little to do that I can't seem to do anything and so nothing gets done. It's very odd and disconcerting and scares the crap out of me but here we are! (I have no similar excuse for the week before last other than sheer laziness).

We had a wonderful get together, full of food, drink, white elephant gift exchanges and, of course, COOKIES!!!! Folks kindly brought appetizers and I know I am going to forget to list a whole bunch of them because I am lame for not posting. So, please post in the comments or edit this post to add what you brought. I seem to recall some fabulous onion dip from Mary S, veggies and dip from Cheryl, a Rice Krispie mix from Mary B, and oh crap! See? I can't remember what all else. So please help me out here, ladies! I made latkes, because it was the first night of Hanukkah. Actually, Mary B. saved me on that as she womanned the frying pan for me.

We may have had some alcoholic beverages as we ate. We then exchanged our "white elephant" gifts and there were some awesome gifts! I coveted Tricia's ice shaver and the cookbooks that folks got. However, I was quite happy with my egg whipper that I got from Nidhi. I've already used it a few times and it is great! (The pretty purple wrapping that it came in still lives on my stereo).

As always, the cookies were fantastic! Of course, I forget much of what was brought except that it was all delicious! We had gingerbread cookies, molasses cookies, Russian tea cakes, Oreo bastards (and their sisters Lemon Bastards and Nutter Butter bastards), chocolate crinkles, sort-of rugelach (that was mine...they only sort of turned out), iced sugar cookies, awesome cookies that had some sort of jam inside, awesome cookies that were extremely light and had some sort of chocolate between them, the official cookie of New Mexico, muffins (that were my breakfast at least one day), the lavendar cookies, the thumbprint cookies, cookies with sprinkles...ack! What else?? They were all fantastic...for real.

In fact, take a look at Kate's picture:


Here is the aftermath:


It was a great time and it was great to see old friends and new faces! Looking forward to our next adventure...and the third annual cookie exchange!

Tuesday, December 22, 2009

Why I eat local food

The other day, I posted some thoughts about why I have trouble calling myself a locavore,  but I realize I should share why actually do eat locally and seasonally.    I have been eating local/seasonal food long before it became fashionable.  Believe me, eating locally wasn't always in style.  Growing up in the 1970s, it was something we didn't want to do.   I just wanted to be like the other kids eating Ding Dongs and drinking Tang.  But no... instead, my dad always took us to Eastern Market during the summer months, when there was a lot more local produce there than there is now.  And he'd buy tons of tomatoes and cukes and stuff.  In the winter months, we always went to Randazzo's Fruit Market and got great fruit and vegetables to eat cheap.  The Italians always had the best fruit markets!  I can still remember getting roasted peanuts there in a paper bag that were still warm when we got home.    My parents didn't have a lot of money, but at Christmastime, my dad always made sure we had nuts in the shell to crack in front of the tree, and easy to peel tangerines.  We always had an orange in the foot of our stocking.  He would buy us pomegranates then, too, long before we were all drinking POM and extolling their antioxidant properties.  He would call them "love apples" with a twinkle in his eye. 

In Warren, everyone was either Polish or Italian.   I can remember wishing I was Italian then - it was more cool because the Italians got to wear dresses that looked like wedding gowns for their First Holy Communion and the movie "Rocky" was really popular, and they had cool food everyone loved like lasagna.   We Polish kids didn't have anything cool like Sylvester Stallone, and we ate stuff everyone said was "bogue" (that was the term we used - it meant "gross") like sauerkraut.   True, we eventually had the Pope, after hundreds of years of Italian Popes, but he wasn't like he was in the movies or anything.  However, one thing we did have was great butcher shops and delis.   While we didn't get to wear an Italian horn gold necklace like our grade school counterparts, at least we had good lunch meat!  Almost every Saturday, my dad would take us to the Kowalski on Van Dyke and 10 mile  and we'd get lunch meat like Krakus Polish ham and Kowalski kielbasa loaf (if you can get your hands on some of the stuff, buy it.   It is SO GOOD.  They have it in Ann Arbor at Hillers) and we each would get a little hot snack sausage that has a Polish name I forgot, but it means "hunters sausage" to eat on the ride home.   And we'd get a jar of horseradish and a loaf of Russian rye bread the likes of which you just can't get in Ann Arbor.  Zingerman's Jewish Rye pales in comparison to it....but you can find it in Hamtramck (or any place where there's a lot of Polish people hanging out still).  We'd also have dill pickles my dad made at home to go with our lunch. 

Eating a lunch like this would only be done in the privacy or your own home, however.   The only kind of sandwich you'd dare bring to school would be bologna or PB&J on white bread.   I used to lie and tell kids at school that my bologna had a first name, and it was "Oscar" and my bologna had a second name and it was "Meyer" but that wasn't true.  My bologna's last name was actually "Kowalski" and it reeked of garlic.   I'd try to eat it fast so no one could smell it and guess I was actually Polish.   I wasn't dark complected enough to pass as an Italian, but my dad changed our last name to make it easier to spell than it's Russian roots, so no one could ever guess that I was really Polish. Sometimes, I'd bring a ham sandwich, but I'd cut the ham into the shape of a square so it looked like someting that was bought at a normal grocery store instead of the telltale rectangular shape of Polish ham.

Another Saturday "locavore" adventure involved my grandpa.  He didn't speak English and lived in Hamtramck, but about once a month or so he'd come out to Warren to stay with us and he used to make chicken soup.  Shopping for soup chicken was an experience I am sure the Italians never enjoyed.  We'd go to a place on Outer Dr. on the east side and pick a chicken out live and they'd butcher it right there while you wait.  He'd feel up all the chickens until he'd find one he thought was fat enough, and pronounce it "Dobrze" which means "good".  Then they would weigh it by laying the chicken on the pan of what looked like a baby scale and crossing it's leg over side of the tray on the scale.   Chickens aren't smart enough to figure out how to uncross their legs, so they would just lay there and complain.   Then, off the chicken went to the back, and after a few squawks, a thump of a cleaver and some feathers flying around , it would be returned to us wrapped in butcher paper.  We'd get extra feet to add to the pot!  They also had ducks if you wanted to make the Polish soup called "czernina" which is made out of duck's blood.  They'd butcher your duck and then give you a steaming canning jar full of it's blood if you were making soup.  

But all the Polish people (and the Italians) moved from Warren north to Shelby Twp and Romeo and such, and lots of the east side's Polish delis and butcher shops have been replaced with soul food joints and Thai restaurants or just plain vacant, so I am not sure where you can get this stuff today. Hamtramck still, if you venture south of 8 Mile, but I bet you can find it north on Van Dyke.  Heck, the Polish and Italian folks are even moving their dead from cemeteries up that way, so I am pretty sure you can find a good loaf of Russian rye.  (not sure the health department allows while you wait butchering of chickens anymore, though).   It's hard to find good Polish food in Ann Arbor outside of the Copernicus Deli on Main.   So why am I a "locavore"?  I like to support local farmers, too, but not because I think there will be a post petroleum apocolypse or anything.     I want to support the local economy because I love the state of Michigan and it's people.   And I eat seasonally because I like the rhythm of the seasons and the food just tastes better.  So, I will eat citrus in the winter, even though it wasn't grown in Michigan.   Eating locally and seasonally and remembering my ethnic roots just tastes good, period.

Monday, December 21, 2009

Swedish Pancakes

I am always on the lookout for waffle and pancake recipes that don't seem too heavy on eggs, milk, butter. The waffles at the FridayMornings at SELMA are a perfect example and I was buying up the mixed batter when it was for sale. You just added an egg, vanilla and maybe a little bit of milk (I forget exactly), but it made for some yummy waffles.

This morning, I decided to make a nice breakfast for Jeff & me. At first, I pulled out the waffle maker, but then I decided that I didn't feel like waffles. So I pulled out my Joy of Cooking cookbook but everything I saw just seemed too rich. So, I next pulled out the red & white checkered Better Homes & Garden New Cookbook and opened to the pancake section. Something called "Swedish Pancakes" caught my eye and I figured, what the heck? Our Swedish friends have given us some cool things like practical dialysis machines, the three point safety belt, Swedish fish, and the absorption refrigerator (except for the fish, all of this information can be found on wikipedia, so it must be true. Not sure about the fish but it sounds good.) Turns out, the mofos can make a nifty little pancake too.

The recipe is very easy. Take 3 eggs and beat them until "thick and lemon colored" (I just beat them for a few minutes and called it good). Add 1 1/4 cups milk, 3/4 c flour, 1 T sugar and 1/2 t salt. Mix together. The batter will be VERY runny but don't panic! It will all turn out fine, I promise.

Heat up your frying pan and put in oil or a spray of that organic oil crap that I found at the food co-op. Let it heat up over medium heat and pour your batter on. Since it is runny, pour it in quick little "spurts" (you'll see what I mean). Keep a careful eye on things as they cook quickly.

You will end up with lovely thin little pancakes, halfway between a crepe and a pancake. The entire batter is 853 calories (not including oil or the calorie free spray shit that I used) and you get so many per batch that you needn't fret too much about calories. I served mine with my local maple syrup and Locavorious blueberries.

The cookbook says to "pass the Lingonberry sauce", whatever the fuck that is. The blueberry syrup worked just fine and made for a lovely brunch. So, thanks my Swedish friends! Even if you didn't give us the wonderful Swedish fish**, you are still alright in my book.

**oh well damn! I guess Swedish fish do come from Sweden. Okay, nevermind.

Sunday, December 6, 2009

Dinner on Less than $2 a Serving

Recently, my friend & fellow lady food blogger, Noelle, challenged our Google group to put that stupid "Walmart lets me feed my family for less than $2!!1!!111!!" commercial to shame. She suggested that we try to feed ourselves and our families for $2 per serving...but using good stuff and not that shit that Walmart slops together and calls "food". Tonight, I took that challenge and made homemade multigrain bread & minestrone soup.

Streamlined (i.e. no knead; use a mixer) Bread (from Betty Crocker's 1960 cookbook)
You simply take 3 c of flour (from Westwind Milling via By the Pound cost $2.19 per pound and I used 1.5 pounds, or $3.28), 2 T shortening (okay you got me here...hadda use Crisco, probably about $.20 worth), 2 T of Pioneer sugar (let's be generous and say $.50 worth), 2 t salt (negligible) & 1 packet of yeast (out of a jar that cost $8.00 and has lasted me forever but I'll be generous and say it was $.75 worth).

You dissolve the yeast into 1 1/4 c warm (not hot) water and then add everything else. Using your dough hook, knead for about 4 minutes on medium speed. Put a towel over the bowl and let it rise in a warm place. The recipe said to let it rise about 45 minutes but I fell asleep and it ended up rising for 1.5 hours. It still turned out great!

Put it into a greased bread pan and let it rise about 40 minutes. Bake at 375 for 40-45 minutes.

I cut it into 8 slices (188 calories per slice, btw). Rounding up, this costs about $.60 per slice.

Minestrone Soup (from Cook's Illustrated)

I didn't follow the recipe exactly, so let me tell you what I did! I took some carrots & kale from my garden (grown from seed so the cost is negligible), an onion (I bought a bunch from the farmers market and I think the whole bunch cost $3.00, so let's say the onion was $.30), green beans and peas from Locavorious (I paid $200 for the subscription and I think I will get about 30 bags of produce, so I guess each bag costs about $6.67 and I used about 1/4 of each bag so I am thinking that would be about $3.00 for both?), 1/2 cabbage from the farmers market ($1.00 for the head; I used $.50 worth), celeriac from my garden (free--a gift from my friend and fellow food blogger, Vivienne), 1 cup cannelloni beans from the Ypsi farmers market (I think the whole bag cost $2.00 and I used about 1/2 at $1.00), the rind of my Parmesan cheese from Morgan and York (the whole shebang cost me like $10, so let's say the rind was $1.00 of it), a quart of my canned tomatoes (about $1.00 worth), 4 cloves of garlic from the farmers market (I got the reject garlic and I think it cost me $.25 a head) salt, pepper, a dash of red pepper flakes, fresh basil and parsley from my basement stash. I used 2 c beef broth (frozen in an ice cube tray) that I made from farmers market beef...no idea on the cost but let's say $.50. I also used about 2 T of olive oil from a jar that cost me $8.00. I would guess I used about $.50 worth?

I boiled my 1 c of beans in 2 Q of water for about 10 minutes and then turned off the heat, covered it and let it sit for a couple of hours.

After the beans had been softened, I sauteed the onions, celeriac, carrots, peas, green beans and kale in the olive oil for about 10 minutes. I then added the garlic, dash of red pepper flakes and chopped up cabbage and sauteed for about 2 minutes. I then set that aside in a pan.

Now, I put the beans, 2 c of beef broth, 8 c of water and a bay leaf (I used a leaf from the Detroit Eastern Market pack that I bought; the whole pack cost $1.00) and the Parmesan rind. I brought the whole batch to a boil and let it simmer for about an hour. I then added the veggies and let it simmer for about 20 minutes. I served it with some Parmesan cheese.

There are at least 8 cups of soup in there, probably much more. Jeff did the math for me and it came out to $1.00. I canz add so I know that $1.00 + $.60 = < $2.00!

Now, to be sure, I had some help in the veggie department, thanks to growing my own and getting the celeriac but I still think that the cost would be fairly cheap, even if I had to buy a carrot and some kale leaves.

So!! Walmart, peeps, you can eat your partially hydrogenated high fructose sodium biocarbonickityickityick heart out!

Eat up!

Thursday, December 3, 2009

Rice Griddlecakes for Leftovers


As a frugal cook who hates to throw food away, I'm always looking for creative ways to use leftovers so they don't taste like leftovers. So I was pleased when this idea of incorporating goodies into rice griddlecakes worked out. They have now become a standard item in our household.

Even dedicated cooks "order out Chinese" sometimes. But what do you do with tiny amounts of leftovers - one shrimp, a couple of pieces of stir-fried Napa, two slices of beef? I've often stirred them into scrambled eggs or made up some fried rice (there is usually leftover rice too). But sometimes that just doesn't appeal.

I was given a copy of Mark Bittman's How to Cook Everything for my birthday and found this griddlecake recipe, which I have modified to accept my leftovers. My changes are marked with an asterisk.

2 eggs
1/2 cup milk
1 1/2 cup cooked rice
1/2 cup grated Parmesan, Gruyere, Swiss, or crumbled feta cheese
1/2 cup all-purpose flour
1/2 teaspoon baking powder
salt, cayenne, and black pepper* to taste or whim
1/2-1 cup of leftover vegetables (relatively firm) and cooked meat, chopped fine*
2 scallions, chopped, or onion*
herbs to taste* (I favor cilantro or parsley)

Whisk eggs, milk, rice and cheese together. Add other ingredients except for vegetable/meat mixture and mix. Then add the vegetable/meat mixture.

Use a cast-iron skillet, griddle, or other nonstick surface. Add small amount of oil (I don't recommend butter because of smoking, though Bittman has it as an option). Use about one large spoonful for each griddlecake, baking several at once; turn and bake until nicely tan/brown. You'll have to add some oil between batches. You're not frying them, you're using a hot oiled surface to bake them.

Bittman recommends tomato sauce but we like these for breakfast with homemade applesauce on the side. They are nicely savory and don't really need much more, though sausage or bacon is never a problem. Note: we put the cakes onto a cookie sheet and into the oven so all are hot at once. This also guards against a gummy not-quite-done interior.

Saturday, November 21, 2009

Ginger Snap Cookies

I have talked about my Brass Sisters before. I love these ladies like they were my own aunts. They have the most excellent recipes, including the one that I made last night.

Jeff has been out of town on a business trip for a month. Well, he came home on the weekends, but it's been a long, lonely month. He was coming home around 11pm last night, and I thought it'd be nice to have homemade treats for him. Since I am making my pumpkin cheesecake with gingersnap crust on Thanksgiving, I thought that I should get a jump on the crust by making gingersnap cookies. They came out great, the house smelled great and Jeff was thrilled! Hope you enjoy them!

2 cups flour
2 t ginger
1 t nutmeg
1 t cinnamon
2 t baking soda
1/2 t salt
3/4 c butter
1 c sugar
1 egg
1/4 c molasses
1/4 c ginger jam or orange marmalade (I didn't have this, so I used my homemade and canned apple butter)*
sugar for rolling cookies

Combine flour, ginger, nutmeg, cinnamon, baking soda and salt. Cream butter and sugar in your Kitchenaid mixer. Add egg. Beat in molasses and jam. Add dry ingredients until well blended.

Chill the dough for about an hour or until firm enough to be handled. With gloved or floured hands, make little balls** out of the dough. Roll each ball in sugar and put on baking sheet. Bake at 350 degrees for about 14 minutes.

*I tried to half the recipe but accidentally added the full 1/4 c of molasses and apple butter, thus necessitating retromixing. It turned out fine, even though stuff was mixed out of order. What can I say? I had taken a nap and my contact lenses were foggy.

** I said "balls"

Friday, November 20, 2009

8 things every Michigan Lady Food Blogger should do...

Okay, so you have started a food blog and you have joined the Michigan Lady Food Bloggers....what to do now?

  1. Become familiar with how google groups work.   As much as I'd like to be able to help everyone learn how to use google groups, I'm afraid I won't have time to be able to help you right away.  If you have a question you can't figure out on your own, you can send it to me at momskitchen at comcast dot net. I'll try to get to it as soon as I can.
  2. Check out the old posts of MLFB on our google group page.  Fun stuff!  That's the best way to get to know everyone and to catch up on our latest discussion. 
  3. Introduce yourself to the group.  Tell us your first name, your blog's URL, and where you live to start.   After that, please tell us anything more you'd like to share.
  4. Attend a gathering!  One of the best things about MLFB is our get togethers.  The food is always fantastic and it's great to meet the author of a food blog that you've admired.
  5. Host a gathering!  Themed potlucks, educational opportunities, group cooking ventures are always popular.   There's certain to be someone that wants to do what you would like to do.
  6. Author something for our group blog, which is myfoodtribe.blogspot.com If you'd like to be added to our group blog, email kimbayer at gmail dot com.
  7. Add yourself to our MLFB map.   Click edit and place a marker on your location.  Title it with your blog's URL.
  8. Invite a Michigan woman food blogging friend to join us
More questions?  Check out the Michigan Lady Food Blogger FAQs.

Sunday, November 15, 2009

Michigan Lady Food Blogger FAQ

Who are the Michigan Lady Food Bloggers?
We are a group of over 50 women that live in Michigan that blog about food.

How did the MLFB get started?
Our history can be found here.

What does the MLFB do?
We have an active google group where we talk about food, writing about food, share advice about cooking (and life) and we occasionally get together for various pursuits...group cooking, potlucks, holiday cookie exchanges, etc.  We read each others blogs, we comment on each others blogs, we inspire each other.

Why is the group only for women? There's lots of great food blogs written by men.
Yes, there are! Men we know often do attend our events. Early on, the group decided they wanted it to be a group made of women food bloggers.

I live in California/Arizona/Florida/Etc. Can I join the MLFB?
Since our group likes to meet face to face throughout the year, we like to keep it local. We do have a few members that have moved away and continued to be a part of our circle, but the group works well because we actually meet in person fairly often.

What is required to join the MLFB?
It's easy to join! To join, women need to live in Michigan and have a food blog. We don't care if your blog is totally about food, but it should include posts about food on occasion.

I don't have a food blog yet, but I am going to start one soon. Can I still join?
It's easy to start a blog.  We want to help you get started by motivating you to take that first step. Today is the day....start that blog!  There are many blogging tools out there, this one is written on Google's Blogger.  It's super easy...here's how to get started on Blogger.   Start that blog!  Then join us.

How do I join the MLFB?
Add your email address to the box on the right.  Upon joining, you will be asked where you live in Michigan and what your blog's URL.   Google groups work best when you have a google account....it's free and you can use your own email address.  You don't need to have a gmail account.  Here's how you can learn more about google groups.

Sunday, November 1, 2009

Slow Food Huron Valley's Local Harvest Cook-Off


Cook up a soup/stew, main dish, or dessert with local ingredients and you could be a ribbon winner at Slow Food Huron Valley's Local Harvest Cook-Off on Sunday, November 8th from 3 - 5 p.m. at the Chelsea Fairgrounds Community Building.

This family event is a wonderful opportunity to share your cooking prowess and support for all things local, as well as enjoy what will assuredly be a delicious potluck.

Old Pine Farm and Tantre Farm have helped to organize this potluck, contest and recipe swap, and in addition to the food and judging, there will be music, prizes and great, family fun. Alber Orchards is also a sponsor for this event. Chef Alex Young of Zingerman's Roadhouse, Corbett Day, Lenawee County Culinary Arts Dept head/chef, and Natalie Marble, owner of Ann Arbor Cooks cooking school (and fellow annarbor.com contributor) will be the Cook-Off judges, and prizes will include jams and local produce, among other goodies.

You could go home a blue ribbon winner by putting together a dish with as many local ingredients as possible in the following categories:

- Soup/stew
- Meat main dish
- Vegetarian main dish
- Vegetable side dish/salad
- Dessert/bread


Please bring: your dish to pass, your place settings, and 30 copies of your recipe to swap. Slow Food Huron Valley is also making this an opportunity to benefit Food Gatherers - so please consider bringing also nutritious non-perishable food or a check for Food Gatherers (which will be eligible for a Michigan Tax Credit).

Deadline for entry in the cook-off judging: 3:15pm.
Chelsea Fairgrounds location: 20501 Old US 12 (at Old Manchester Rd.)
Questions: leadership@slowfoodhuronvalley.com


All photos by Jennifer Shikes Haines.

I'm Jennifer Shikes Haines and my blog is a2eatwrite. Please contact me at: Jenshaines at gmail dot com.

Monday, October 26, 2009

Country Cornbread


This goes great with Chili or Bean soup or well just about anything and it is so easy and so fast.

1 cup Whole wheat pastry flour
4 Teaspoons baking powder
1/2 teaspoon salt
1 cup corn meal
1/3 cup sugar
2 eggs, beaten
1 cup milk
1/3 olive oil
2 Tablespoons vegetable oil

Preheat oven to 400 with a 12 inch cast iron pan in the oven.
Combine flour, baking powder, salt, cornmeal, and sugar in a large bowl.
Combine eggs, milk, and 1/3 cup oil in a small bowl; add to dry ingredients. Stir until dry ingredients are moistened.
Add 2 T. oil to hot cast iron pan and then spoon in the cornbread batter. Bake for about 25 minutes or until a knife inserted in the center comes out clean. If using a smaller cast iron pan cook time will be longer, but it will work fine.

Heating the pan first gives a nice dark crusty bottom to the cornbread that I just love. Everyone that I have ever served this to loved it also.

Friday, October 23, 2009

Sweet Potato Stew

While I couldn't be at the recent MLFB gathering, the following recipe is one I would, undoubtedly, have loved to bring along. Sweet potatoes are in season in Japan at the moment and can be found in everything from desserts to main courses to appetizers. A little different than their American cousins - deep purple skin with a bright yellow interior that holds its own even after cooking - we've been happily chomping away at the recent harvest from the farm.

Here's my version of this original recipe I found on Epicurious years ago. It's a sure crowd pleaser, and it tastes good the moment it's made. The orange juice base makes it good for warding off colds, too.

Joan's Sweet Potato Stew
2 tablespoons olive oil
2 cups (or one whole medium to large onion) chopped a bit coarsely
2 tablespoons fresh minced ginger (without is ok, too, but it is a lovely addition)
1 1/2 teaspoons ground cumin
2-3 medium to largeish peeled sweet potatoes, cubed
4-6 cloves of garlic, minced
2-3 cups of orange juice
1 15 ounce can of black beans (2 is good, too) rinsed and drained

Heat the oil in the soup pan, throw in the onion, and cook covered until the onion is well-cooked and soft. I find the longer I cook it (without burning it) the better. Throw in the garlic, ginger, and cumin, and cover again. Toss in the cubed sweet potatoes, stir, and add the orange juice. I tend to add orange juice until the mixture is covered and the sweet potato bits are swimming a little. Then I throw in the beans, and let it simmer along until the sweet potatoes are done.

Sunday, October 18, 2009

SOUPer Exchange!

This past Friday, I had the pleasure of spending some time with my friends, the Michigan Lady Food Bloggers! This time around, we had an Oktoberfest beer tasting + soup exchange. This means, of course, that I got to eat soup, take soup home and drink some beer in my little Arbor Brewing Company tasting glass.

For my part, I brought some French Onion soup for the exchange, some butterscotch bars to snack on and Bell's Brown Ale to share.

The recipe for the French Onion soup is ridiculously simple. Since I worked all day Friday, I had to have something crock pot friendly, and here is what I did:

I sliced up about 6 large onions the night before, and sauteed them in 1 stick of butter (mmmm!!!! Smelled like Thanksgiving morning).

On Friday, I put about 60 oz of beef broth (I cheated here and used some organic stuff that I found at Kroger), 1 tsp of Worcestershire sauce and some bay leafs (plus the onions, of course) into my crock pot. Then I put it onto the slow setting, plugged it in and went off to work.

When I came home, the house smelled great! I sent Jeff off to Morgan and York for some bread and cheese. He came home with a loaf of French bread and some very yummy farmers soft cheese. Once I got to Alison's house, we put some cheese on the bread, broiled it and there we had it!

Here are our lovely soup pots:


We also had snacks!! For my part, I brought something from the Brass Sisters' cookbook and as always, my girls didn't disappoint. I made the butterscotch bars with brown sugar meringue topping.

You will need:
2 cups pecan pieces (I only had walnut, so that's what I used this time; I've used pecan before and either type of nut is fine)
1.5 c flour
1.5 t baking powder
1/8 t salt
1 c brown sugar
1/2 c cold butter, cut into dice
2 egg yolks
1 t vanilla

For topping:
2 egg whites
1 c brown sugar
----

The recipe wants you to brown the nuts first. I have down that before, but I didn't have time this time around so I didn't do it. I don't know that there was a noticeable difference. If you choose to brown the nuts, put them on a baking sheet and bake for about 7-10 minutes at 350.

Meantime, put some foil (shiny side up) into a 9x13 pan and spray with non-stick spray.

Combine the flour, baking powder, salt and brown sugar in a food processor fitted with the metal blade. Add butter. Pulse until the butter is the size of small peas. Add the egg yolks and vanilla and pulse until the mixture has the consistency of sandy clumps.

Put the mixture into the pan and press it in (I used my hands...they were clean). Press the nuts on top.

Now, you need to make the topping. Beat the egg whites until they peak. Add brown sugar and beat for 4 more minutes, at a high speed. Then spread on top of the stuff in the pan and bake for about 25 minutes at 350.

Of course, I fucked up the topping and put some brown sugar in at the beginning. I found that this makes them not "peak", no matter how long you leave it under the Kitchen Aid or how much you pray to the God of Egg Whites. So, I had to dig out some frozen egg whites from my freezer and thaw them under the hot water in the bath tub. (My sink was full). I found out that the Kitchen Aid will toss out frozen clumps of egg whites and it's quite a treat to catch them or scoop them up from the counter (it was clean). At any rate, I finally got the f'in egg whites to peak and then I put in the brown sugar and all was good.

Here is the picture of the food bloggers!!

Wednesday, October 14, 2009

Beer Chili


This time of year calls for chili (yes it is even cold in Mexico City) and what could be better than chili with beer in it, right Patty?

Beer Chili to keep you warm:

2 thick slices nice smoky bacon, cut into cubes
1 medium onion, chopped
16 ounces lean beef
minced garlic, 2 cloves
1 bottle beer
15 oz can stewed tomatoes with juice, break the tomatoes up with a spoon (or your by squeezing with your hand)
1 teaspoon cumin
2 tablespoons chili powder
1 teaspoon paprika
1 teaspoon smoked chipotle powder
1 teaspoon cheyenne (if you like it hot)
1 bay leaf
1 teaspoon salt
pepper
can black beans drained and rinsed (or what ever bean you like)


Brown bacon in a deep pot, once brown add in the onions and cover and let cook over medium heat until translucent, about 5 minutes. add into the pot the garlic and ground meat and let it brown. Once the meat is brown add in the been and cook until it evaporates and the meat is really cooked down, about 10 minutes. add in the rest of the ingredients except the beans, cover and cook for about 30 minutes. add the beans and cook for another 5 minutes.

Wednesday, October 7, 2009

Apple Bacon Roast Chicken


It’s finally cool enough that firing up the oven actually sounds appealing…especially if, after a while, a tasty roast chicken just happens to come out of said oven. I also had a couple of roaster chickens knocking around in my fridge so I set out to find an interesting roast chicken recipe. Among several intriguing choices, this one caught my eye because not only did I have all the ingredients at home already but one of the ingredients was bacon. Bacon that you covered the whole bird in. This I had to try.

My husband isn’t one for the sweet and meat pairing so I used the Recipezaar recipe more as inspiration than as tried and true directions. However, I bet maple syrup glazed, bacon coated, apple cooked chicken would be absolutely fantastic. One of these days when my husband is out of town I just may make Maple Bacon Chicken as written but for now, here’s my inspired but different Apple Bacon Roast Chicken.

Ingredients
1 roaster chicken (4lbs-ish)
1 apple
1 lb bacon
2 potatoes
1 handful of baby carrots or 2 sliced regular sized carrots
2 onions
black pepper
Cayenne pepper
salt
1T oil

Directions
Preheat oven to 375 degrees.

Lightly grease the bottom of a chicken roaster with oil just to keep the veggies from sticking. Slice the potatoes and onions into the bottom of the pan. Add the baby carrots/big carrots.

Wash the chicken and remove the giblets plus any excess fat. Salt and pepper the top, bottom and cavity of the chicken. Peel and quarter an apple and put it in the cavity. Place the chicken in the roaster, breast side up. Cover the top with the bacon. Cover the roasting pan and cook for 1.25 to 2 hours, depending on the size of the bird.

Production Notes
First of all this was one delicious bird, although I wish the apple and bacon flavor had come out more strongly in the meat. I expect that the maple syrup glaze might help somewhat to flavor the chicken with bacon and apple. The veggies, on the other hand, tasted of apples, bacon and awesome even if they were a bit greasy. Quite a bit greasy actually but it was totally worth it. Yum.

We were a little perplexed as to what to do with the bacon once the bird came out of the oven. It looks pretty but is a little impractical once you get down to carving. We wound up pulling the bacon off and piling it on one side and then serving a couple strips with a cut of meat and some veggies. Ultimately, cutting the bacon up with pieces of chicken worked the best and I’ll bet that changing up strips of bacon for chopped bits would solve the bacon conundrum. A sort of bacon encrusted roasted chicken if you will.

Friday, April 10, 2009

Hrudka (Slovak egg cheese for Easter)

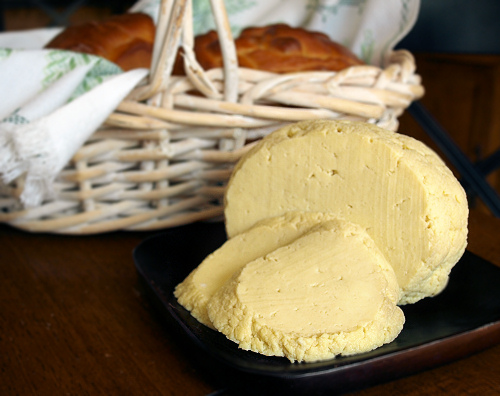
The Slovak traditions for Christmas and Easter have imprinted certain taste memories that I can't avoid craving every year. One of the things I wonder why I desire is hrudka. Hrudka is also called cirek, sirets, sirok, sirecz, as well as just Easter egg cheese (by those who have trouble trilling their Rs) and it is basically a ball of scrambled eggs served at Easter. Some people put a slice of it on sandwiches but I always ate it plain with salt.

My family is always generous and I know that there would be a ball of hrudka for me to take at Easter. But this year things are a little crazy with our move coming up and I don't know for sure what our plans will be. Plus, the hrudka my family makes has cow's milk and my son has never been able to taste it. So this year I asserted my independence and made my own. It was fairly easy and the flavor only barely changed with my soy milk substitution. That is it still tasted like a ball of scrambled eggs. What can I say, it's tradition and somehow makes sense to my springtime taste buds.

I also was inspired by the posts on Bittersweet, a vegan blog. There she made soy cottage cheese spread and used the soy whey in bread for the following post. It's probably terrible for me to un-veganize an idea but in this I'm trying to respect the gifts of the eggs and not let any part go to waste. So I used my whey in the traditional paska (Easter bread), now made non-traditional with my dairy-free soy milk. Using the whey is apparently common but it's not something my grandmother did so I didn't know about it before. I'm waiting to taste the bread until Easter morning but it looks gorgeous this year and has a richer smell than my previous versions with just soy milk. Now that I've had my hrudka fix I can start playing with homemade soy cottage cheese!

Hrudka (Slovak Easter Egg Cheese)
Adapted from the recipe found in "Our Best to You", the 1st edition Sacred Heart Byzantine Catholic Church cookbook of Livonia, Michigan. The original recipe was submitted by Mrs. Helen Rapasky. Hrudka is served for Easter along with ham, kielbasa, beet horseradish, and paska (Easter bread). Some people put it on a ham or kielbasa sandwich but I always eat a slice plain with a little salt. This savory version is what my family makes but sweet variations are common, some are listed at the end of the recipe.
Makes 1 large ball of cheese, ~1 3/4 pounds

1 dozen eggs
1 quart milk (dairy-free for us, I used soy)
1 teaspoon salt

-Set up a large double boiler or make one using two pans or a pan and a bowl. I used a large stainless steel bowl over a saucepan. Fill the lower pan with an inch of water. Bring the water to a boil and turn down the heat so that it is strongly simmering.
-Off the heat, beat the eggs in the upper pan or bowl and then add the milk and salt. Beat all the ingredients to combine and then place over the pan of simmering water.
-Cook the egg and milk mixture stirring frequently with a wooden spoon until the mixture curdles, this will take approximately 20-30 minutes. You'll see curds separated out and leave a thin, watery whey. Stop once it seems like no more whey is being produced, IE coming out of the curds.
-Line a colander with a square, double layer of cheesecloth and place over a large bowl or pot. Pour the curds and whey carefully onto the center of the cheesecloth.
-Gather the cheesecloth together to form a large ball with the curds. Twist the top and press to remove more whey and then tie with kitchen twine.
-Tie the ball to a wooden spoon and suspend it over a pot to drain further and cool. Other directions recommend tieing the ball to your kitchen faucet to drain.
-When the ball is mostly cooled and not dripping any more whey place it in the fridge to set overnight. You can save the whey to make paska (Easter bread), links to paska recipes follow.
-After chilling overnight, remove the cheesecloth. Store in the fridge wrapped with plastic or waxed paper. Serve slices on sandwiches or on their own sprinkled with a little salt.

Hrudka variations:
I have never had anything but the plain unsweetened hrudka but sweet recipes are common, just Google hrudka recipe. These recipes have anywhere from 1 tablespoon to 1 cup of sugar added to the one dozen egg recipe and most of the sweet versions also have vanilla extract. There are also recipes that call for any one of the following: cloves, caraway seeds, cinnamon, pepper or saffron. For a drier cheese you can bake the drained ball for 15 minutes at 350 degrees F. Baked ball of scrambled eggs sounds even more bizarre to me.

Paska bread recipes:
My grandmother never used the whey for her paska bread but I like the idea of not wasting it. Plus, since I'm using soy milk in place of the traditional cow's milk I'm hoping it will add more flavor to my bread. I used the paska recipe from the same Sacred Heart church cookbook but only made the plain dough. The plain dough gave me enough for three small loaves. Here is another simple paska recipe that is similar to others from my grandmother's church cookbook. For something different you could try this paska recipe using whey and whole wheat flour.

Cooking the hrudka (counter clockwise from top left): starting cooking the egg and milk mixture, curds begin to form, curds and whey
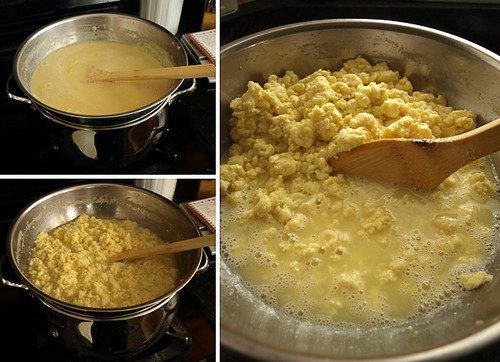
A closeup of the hrudka curds and whey
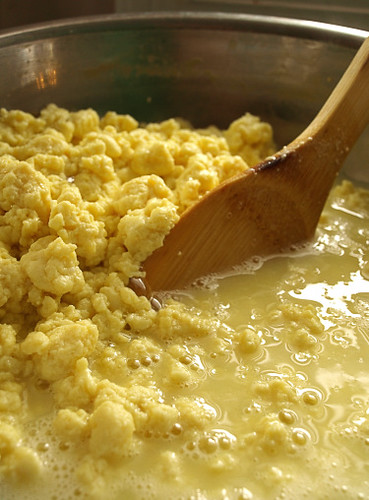
The colander and cheesecloth ready to strain the hrduka curds from the whey
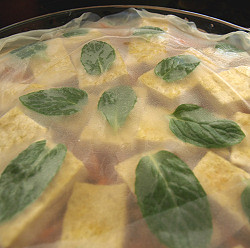
 Hanging the hrudka
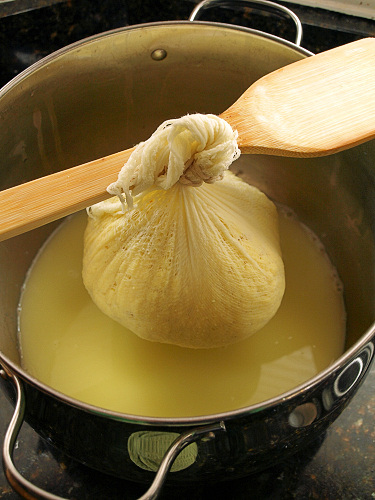
This year's paska bread

Crossposted on Dog Hill Kitchen

Saturday, April 4, 2009

April theme?

What's up for April, ladies? Easter or Passover recipes? Ways to use spring veggies? Ideas?

Patti :)

Sunday, March 22, 2009

Ginger-Chocolate Stout Cake & Couscous Salad

Cross posted to Good Life = Good Food, Good Beer

Recently, we had a dinner party. This gave me the perfect opportunity to try out some recipes that have been waiting patiently in my kitchen.

First, I made Couscous Salad from a recipe that I found, in all places, in the Ann Arbor News. I must admit some hesitancy to eat couscous. Part of this concern comes from an episode of South Park wherein Chef shares that Meatloaf's original stage name was Couscous...and you can see how well that went. It turns out that it's not as bad as I thought.

Ingredients:
1/4 cup balsamic vinegar
3 T brown sugar
1 c quinoa (which I call the Q stuff, because I can't pronounce it)
2 c salted water
olive oil
1 c hot water
1/4 cup scallions (I used regular yellow onion)
1/2 cup dried figs (yum!!)

1. Bring the vinegar and sugar to a boil and then simmer. Simmer until the mixture coats the back of the spoon. Not really sure what this means, so I just simmered until it looks semi-thick. Let liquid cool.
2. Bring 2 cups of salted water and the Q stuff to a boil. Simmer. Turn off heat when you see the tail of the seed open. Again, I didn't know what this meant, so I just kept an eye on it until the appearance changed and, sure enough, it look like a little tail! Drain and cool.
3. Add 1 cup hot water to the couscous and add olive oil to cover. Cover until mixture is absorbed, about 15 minutes.
I had an oopsie-poopsie with this one--water wasn't hot enough--so I ended up just boiling the water until the couscous was chewable.
4. Chop onions and figs and mix everything together. Let it sit overnight to properly blend the flavors.

------------------------

Ginger-Chocolate Stout Cake

I got this recipe from Vegetarian Times. It is described as chocolate cake for grown-ups, and I must agree.

Use:
2 c of flour (I used whole wheat all purpose)
3/4 c unsweetened cocoa
1 T ginger
1 T cinnamon
2 t baking powder
1/4 t salt
1 c maple syrup
1 1/4 cups stout (I used 2 cups :) )
1/2 c butter
1/4 c brown sugar
2 eggs

1. Preheat oven to 350. Grease 9x11 pan (I used 9x13 and it came out fine). Whisk together flour, cocoa, ginger, cinnamon, baking powder and salt in a bowl.
2. Place 1 c maple syrup into a bowl. Bring stout to a boil and add to the syrup.
**Let me say that bringing beer to a boil was weird. I've previously only brought beer to a boil when it wasn't quite beer yet....
3. Beat butter and brown sugar with your Kitchenaid. Beat in eggs. Alternate adding the stout and the flour mixture to the batter. Pour into prepared pan and bake about 35 minutes.

You also make a topping for it, but I didn't care for it. You just mix 1 c low fat sour cream and 2/3 cup light brown sugar. I served this on the side, but most people just ate the cake.

If you cut it into 16 squares, each piece has about 250 calories (with the topping on it).

Monday, March 9, 2009

Hiatus until April

To my dear bloggy buds,

I'm throwing up my hands. It's a good thing - I just have too much going on this month and I recognize when I need to say "uncle".

I'll miss you all, but I'll be back April 1st.

Just think of it as my April Fool's joke.

Happy March!

(cross-posted at a2eatwrite)

Friday, February 27, 2009

Spicy Greens with Bulgur


Although the recipe has already been published on my blog, I remember how many of you enjoyed it at our previous Summer get-together and thought you might like to have the recipe.

Originally, the recipe calls for a variety of greens called khoubiz or bakool , which is found growing wild in the fields of North Africa. It tastes like a cross between arugula (rocket leaves) and watercress, with a hint of acidity, and there is no real equivalent for it here in the US. After experimenting, with fair results, with spinach, arugula, Tuscan kale, dandelion, I've had the best luck with the combination of spinach and arugula. It may not be much to look at, but when you have cumin, turmeric and red pepper flakes mingling with bulgur and spinach and arugula, the fusion is irresistible. Even for those who pretend detesting spinach, or any greens for that matter. (I have a friend who wouldn't eat anything with a green color and he absolutely loves this dish)

The spices and the cloves of garlic are pounded using a mortar and pestle to extract as much aroma before adding the resulting paste to the "sweaty" onions. As you pour the stock over the lovely ochre colored onions, restrain yourself from dipping your bread, or your fingers, as it is getting ready for the bulgur. At the end, steamed spinach and arugula join the party; a party that took half an hour to put together and will take half the time to gulp down. It's exquisite. I assure you. It's still fine the following day straight from the fridge, sitting on the countertop with a piece of bread in one hand and orange soda in the other. Every bite brings with it a part of home and my mother's kitchen into my own kitchen.

Happy weekend, my friends!

My mother's Spicy Greens with Bulgur (Tchicha bel Khoubiz)

Recipe: Serves 4
- 2 tbsp extra virgin olive oil
- 1 medium onion, peeled and finely chopped
- 3 garlic cloves, peeled
- 1 tsp cumin, freshly ground
- 1 tsp red chili pepper flakes
- 1/4 tsp turmeric
-1 tbsp tomato paste
- 2 cups chicken or vegetable stock
- 2 tbsp fine bulgur
- 1 spinach bunch
- 1 arugula bunch
- 1 tbsp cilantro leaves, roughly chopped
- 1 tbsp parsley leaves, roughly chopped
- Salt, Black Pepper

Wash the spinach and arugula. Drain off the excess water and put them in the basket section of a steamer. Cover and steam over simmering water until the greens just start to wilt, but still have their vibrant green color, about 5 - 7 minutes. When cold to handle, squeeze the water out of the greens and chop roughly. Set aside.

In a pan, heat the olive oil. Add the onions and cook on a medium heat until translucent but not brown, about 5 minutes. Meanwhile, pound the garlic with turmeric, cumin, and pepper flakes to a paste using a mortar and pestle. Add the garlic paste to the onions and stir to incorporate. Add The tomato paste and the stock and bring to a boil. Add the bulgur and stir again. Lower the heat to a gentle simmer and cook covered until the bulgur is tender, about 15 minutes, depending on the variety of your bulgur.

Uncover the pan and add the steamed greens and the herbs to the sauce. Stir and cook for another 2 minutes and then remove from the heat. Season with salt and pepper and serve.

The dish keeps well in the fridge for up to 2 days, although I never recall keeping it longer than one day.


Wednesday, February 25, 2009

Blogger Aid Cookbook: Children are The Future

This was originally posted on my blog, a2eatwrite, but I thought it might be of interest to the Michigan Lady Food Bloggers group (and those in absentia). It's a wonderful project that will help raise money to feed hungry children and to keep them in school.

So... there's this cookbook:


If you don't know what this is all about, just check out yesterday's post.

The rules for submission are that you can post ABOUT the recipe on the blog, but you can't post the recipe.

I really struggled with what to choose. First of all, I've been sick, sick, sick with one thing or another since early January and my cooking production is not what it usually is. Second, for a whole variety of foods, there are other bloggers who would blow me out of the water - not that this is a competition, but I just would feel... out of my league. Entirely. And I'm going to write about those bloggers tomorrow.

Finally, I realized that desserts would work. Especially healthy desserts that are low in calories and fat, but big on flavor. I do those well.

So I leave you with two choices:

The first is Bittersweet-Banana Power Muffins:


Imagine your house smelling of melted chocolate and rich banana. Imagine cheating on your diet for breakfast (or dessert). Imagine a complete meal of whole grains, fruit and protein and anti-oxidants in a delicious, chocolate muffin. Imagine the whole thing coming in at under 150 calories and under 5 grams of fat.

Imagine... Bittersweet-Banana Power Muffins.

The second, though, is actually my favorite - Orange-Pistachio-Apricot Biscotti:


Imagine biting into a burst of Middle Eastern flavors. Imagine the delicate smell of orange flower water and the tart goodness of dried apricots mixed with the salty goodness of pistachios. Imagine the delicate crunch of this biscotto, which uses a secret ingredient for a slightly different, more delicate texture. Imagine a perfect accompaniment to that morning cup of coffee that won't even put a scratch in your calorie budget. Imagine biting into Spring.

Imagine... Orange-Pistachio-Apricot Biscotti.

Okay, gang, what I submit is up to you. Please just leave a comment below, and that recipe will (hopefully) become part of the history that is Children Are The Future Cookbook. Please leave your votes in the comments section.

And while you're at it, don't forget my Blogger Aid Give-away. Do a good deed and be entered to win a good book!

Monday, February 23, 2009

brown rice sushi salad with seared tuna

I can usually be found blogging at simmer down! (a food lover's blog), but seeing as how I had taken part in suggesting this month's "heart-healthy" theme, I thought it was as good a time as any to get over here to our MLFB blog and submit my first post! The theme gave me an excuse to revisit a Japanese-inspired rice salad that I've made in the past, but to try it with brown rice this time to make it more nutritious. It also includes avocado and tuna, both of which are recognized for their heart-healthy benefits. (The links will take you to a site where there is specific info about why these items are good for the heart.) If you like sushi but have steered away from making it at home because rolling it seemed tricky, this is a recipe for you- it has all the same flavors as sushi in a free-form version. (For another heart-healthy brown rice salad recipe, check out this post.)


For the rice, I used Lundberg Sweet Brown Rice, but I think any short-grained brown rice would be fine. Word to the wise: I strongly advise against following Lundberg's directions on the rice-to-water ratio. I used a 1:2 ratio per the package instructions, and my rice came out like soupy porridge. I had to start over and make a new batch for the salad and was pretty annoyed with myself for not having gone with my gut! I did the second batch with a 1:1.5 ratio (i.e. 1 cup rice to 1 1/2 cups water) and I felt it was still a little too much water, but I just put it in a colander and let it drain a bit. You're going for a consistency that's slightly sticky but not overcooked.

For the protein, I used yellowfin tuna that I pan-seared and left rare in the center, but you could certainly use raw tuna or salmon if you can find sushi or sashimi-grade (deemed safe for eating raw). I used one tuna steak that weighed 1/2 lb; I'd say this would be enough for 4 small-ish lunch portions or 2 larger dinner portions. Feel free to up it to 2 steaks if you want it heavier on the protein, but I just went with 4-5 slices per serving. Alternately, what I often do when I make this to take in my lunch is just use good-quality drained canned tuna. You could substitute sautéed or boiled shrimp too, or some grilled tofu.

brown rice sushi salad with seared tuna

2 cups short-grain brown rice
sushi vinegar or rice wine vinegar (see notes)
furikake seasoning (see notes)
about half a cucumber, seeds scooped out and cut into small matchsticks
1 large carrot, peeled & grated
1 ripe but firm avocado, cut into slices or medium dice
1-2 scallions, thinly sliced on the bias
1 tuna steak (approx. 1/2 lb), thawed if frozen, or 2 if you want bigger portions (see notes)
soy sauce
pickled ginger
wasabi paste

Notes: Furikake is a Japanese rice seasoning. It comes in different flavors but always contains sesame seeds and shredded dried seaweed. Sushi vinegar is "seasoned" rice vinegar that has sugar and salt added to it. If you can't find it, just dissolve 1 tsp sugar and 1/2 tsp salt into 4 tbs regular rice vinegar. For the tuna, I would suggest buying it frozen, since the stuff you get at the fish counter has typically been frozen and thawed anyway, even in the "upscale" markets. Trader Joe's has packages of frozen tuna steaks that are reasonably priced. If using 2 tuna steaks for larger portions, I would probably up the rice to 2 1/2 or 3 cups.

Directions: In a plastic container large enough to hold the tuna, mix together 1/3 cup soy sauce and wasabi to taste. Don't be afraid to go a little on the hot side; the heat will mellow upon cooking. Add a couple tbs of sushi vinegar or mirin (rice wine). Rinse and pat your tuna dry. Leave it to marinate in the soy while you prepare the other ingredients.

Cook the rice. As soon as it's done, stir in 4 tbs sushi vinegar, mixing well. Shake in a generous amount of furikake seasoning, stirring well to incorporate and cool the rice. (If you're unsure how much furikake to use, just add and taste as you go. I tend to use about 1/4 cup.) Set rice aside, covered; you'll want it room-temperature when you assemble your salad.

Heat a small amount of vegetable oil in a heavy skillet (not non-stick) over medium high heat. If you like, you can add a few drops of toasted sesame oil. When the oil is hot, place the tuna in the pan and cook undisturbed for about 2 minutes (3-4 minutes if you don't eat it rare). Flip and cook the other side for another minute or two (again, longer if you want it less rare). I brushed a little sweet chili sauce on the tuna and coated it with toasted sesame seeds, but honestly it was a little messy and I'd probably skip this next time. Set aside tuna on a cutting board. Pour the remaining marinade in the skillet and cook for a couple minutes to reduce; it should be slightly syrupy. When the tuna has cooled a bit, cut it into slices. If it's cooked past rare, it may fall apart a little when you try to cut it, but it'll still taste good!


You can put the salad together two different ways: when making this for a lunch to take to work, I just toss the carrot, cucumber, tuna and avocado in with the rice, along with some julienned pickled ginger, and sprinkle a little soy sauce on top. For a slightly fancier presentation, you can put little clumps of each ingredient on top of a bed of rice, with a few tuna (or salmon) slices fanned over the top (as in the photo). Drizzle some of the soy/pan juices on top and sprinkle with some of the scallion.

Sunday, February 22, 2009

Adopt an Olive Tree

A few years ago, my life long (well, since college) best friend, Tiffany, got me a subscription to Vegetarian Times. I usually find at least one or two good recipes, even though I am a carnivore. This month, there was a small article about a place in Italy where you can adopt an olive tree. I cut it out and thought about it for about an hour. Then I went onto the site and adopted a tree!!

I did this for a few reasons. Right now, I have some extra money (until my anticipated $5,000-$10,000 pay cut next school year, that is) and it seemed like a nice, eco-friendly thing to do. (Note: After I put in my information, I realized that I had put in the wrong card # and the $130 is actually coming out of my student loan money, but whatever. It all gets paid in the end.) Also, it just sounds cool!! You get an adoption certificate and everything! And I can visit my tree anytime I want (provided I spring for the air fare and the horse tranquilizers that I'd need to get on a plane for that long).

But it's something kind of cool. You know, so when someone asks "What'd you do this weekend?", I can be all, "I adopted an olive tree in Italy, MFer!!" I have a good story, a tree gets adopted, a farmer gets my money (exchanged into Sterling British Pounds, no less). Win, win, win!

Saturday, February 21, 2009

Homemade Pizzas for Valentine's Day

You can see that some of the heart shapes are better than others but the intention was heart-felt - i.e., heart-healthy individual pizzas, made with whole wheat crust (whole grains), pizza sauce and pesto from home-grown ingredients (no high fructose corn syrup, no added salt, no chicken fat - yes, some commercial pizza establishments have used chicken fat in their pizza sauce), roasted veggies in extra-virgin olive oil (heart-healthy fats and too many health promoting phytochemicals in the veggies to count), with just a sprinkle of full-flavored cheese for visual interest and taste (instead of the gobs and gobs of mostly tasteless cheese that usually smothers commercial pizzas).

Here is a close-up of the most perfect of the heart-shaped pizzas that I made for my sweetie.


These pizzas were followed by thawed organic strawberries from our garden, carefully guarded in the freezer to be used only for special occasions just such as a Valentine's Day dessert. :-) So sweet that no extra sugar needed. Sweets (naturally so) for the sweetest! Yes, those are baby fresh mint leaves from a plant growing in a windowsill pot during the winter. :-)


Enjoy and savor this easy meal that is also easy on the budget plus easy on your heart. If desired, spend the money you've saved on a great bottle of red wine or special dark chocolates, incidentally, both also "heart-healthy" foods! I think this is a win-win-win stay-at-home meal. :-)

Diana Dyer

'shrooms

I think mushrooms are heart-smart, right?

To my surprise and delight, there were mushroom farmers at the Farmers' Market today. This past summer, I discovered shiitake mushrooms, but since I can never remember their name, I just call them the "S mushrooms". Luckily, they had the "S mushrooms" and so I got some. They cost $4 for 1/4 pound...I have no idea if this is reasonable or not, but they did taste the awesome. I made locavore pizza tonight--cheese from a local cheesemaker in Tecumseh, crust with Westwind whole wheat flour, sauce using frozen sauce from my tomatoes and freshened up with the last of my dried oregano, toppings from my frozen red peppers (from my garden!), the 'shrooms, frozen spinach (from the market) [store-bought ham was on there too, but just for Jeff]--and I must say that the 'shrooms were really a nice treat. They had the nice, earthy taste that you'd except from fungi. Once I refamiliarized myself with their taste, I was delighted. Topped the dinner off with Bell's Best Brown ale and I'm a happy girl.

Sunday, February 15, 2009

Heart Smart: The Simplest Pasta Recipe Ever

In keeping with our month-long, Valentine/heart theme, I would like to offer a simple recipe that I sometimes make when I am short on time.

You start with olive oil, and it is up to you how much you want to use. I usually coat the bottom of my frying pan, and that is usually enough. Mince some garlic and add to the olive oil. Heat until fragrant (and it's a lovely smell, believe me). Add some red pepper flakes. Cook up some whole wheat pasta (I recommend Al Dente and I usually cook about 1/2 the bag). Add the pasta to the olive oil mixture and there you go--a simple, delicious, effective, heart-smart meal!

Now. If you don't want to be heart smart, you can do what I do and top it with some pepper jack cheese. Serve with bread and/or salad.

Enjoy!!

Saturday, February 7, 2009

Heart Healthy Mashed Potatoes

Have you tried the Laughing Cow semisoft cheeses? They are really great, and each wedge is only 35 calories, 2 grams of fat and 10 mg of cholesterol. And unlike lots of "light" foods, there is not "fake stuff" in their cheeses. The Laughing Cow logo is from World War I in France - it was how trucks carrying meat to the front line were festooned. I made mashed potatoes the other night, and I was looking to make them Weight Watchers friendly. Instead of my usual half and half and butter, I used Laughing Cow Garlic and Herb cheese and skim milk.
Cheesy Garlic and Herb Mashed Potatoes
serves 4
6 small potatoes
6 wedges Laughing Cow Garlic and Herb Light cheese
skim milk
kosher salt and fresh ground pepper, to taste
Boil potatoes who in their skins until they are soft - about 20 minutes. Put them through a potato ricer. Add cheese wedges and enough skim milk to get it to the right consistency. Add salt and pepper to taste. By my calculations, each serving is 4 points and 20 mg cholesterol - and this is a really generous serving!

Wednesday, February 4, 2009

Summer in January Event

The spread

On January 24 the lovely ladies of the MLFB descended on my house for a late-afternoon get-together that was intended to transport us back to those warm and luxurious days of summer. If it had to be winter outside, then it could also be summer inside, if only for a few hours.

I can't emphasize enough how fortunate I feel to be part of this group of women. You guys (gals?) rule!

This is what happens when you spend the first part of the afternoon listening to opera and get home 45 minutes before the party starts: total biscuit chaos.

Patti, Diana, and Jen (Zora on the couch)

Zora, Cathy, Kim, and Alex (I apologize for the big fingerprint smudge)

Cindy (aka MK) and Alex's fabulous mojitos in the foreground (oh, so divine!)

Maggie's miniature cones and berry sorbet...yum!

Patti's blackberry pudding made with frozen blackberries from Locavorious

The way it should be: an empty glass at the end of the day

Wednesday, January 28, 2009

Mark Bittman's Speedy No-Knead Bread Recipe

I've long been a fan of Mark Bittman. D wanted to "learn" cooking some time ago and I got him Bittman's How to Cook Everything for his birthday. D hasn't used it much, but I have. Constantly.

The one area where he leaves me somewhat cold is baking. I haven't had the best success with his various baking recipes, so when his "No-Knead Bread" was tearing up the internet, I was skeptical.

I also often don't have the planning time to put dough in the fridge for a day or two. I wanted something where my boys could eat bread and then I could make some more. Quickly.

Well, another issue I had with it was it called for a dutch oven, and I believed I needed a cast iron dutch oven, which is something I don't own. A more savvy friend told me, however, that an enameled dutch oven was just fine, as long as the cast iron was underneath. It was. And a love affair was born.

The gorgeous photo will have to wait for later, as I forgot to take pictures with my last loaf, and my current loaf is rising as I write this.

Suffice it to say that we now have gorgeous loaves of tangy, artisan bread for a mere $1.67 for 16 BIG slices. Suffice it to say, I couldn't be happier.

Want in on the goodness? Go here (and you can also find the gorgeous photos that I didn't supply this week).

NOTE: Do NOT try the whole wheat recipe - it doesn't seem to work that well. I'm still working on a no-knead recipe for decent whole wheat bread - if you have any ideas, please let me know.

Happy Wednesday!

Oh... and for my calorie-counting friends, here's the nutritional info, provided by sparkrecipes.com:

Fat: 1.1g
Carbohydrates: 18.1g
Calories:94.2
Protein: 2.6g

A serving = 1/16th of the loaf. It's a decent sized serving.

Monday, January 26, 2009

Mojito


1. Squeeze the juice of three lime slices into a glass. Drop slices into glass as well.
2. Add 7-9 fresh mint leaves and one ounce of simple syrup (recipe follows).
3. Using a muddler, give the mint leaves and the lime slices a few good smashes and twists.
4. Add crushed ice to the glass, filling 3/4 of the way to the top. Pour in one ounce (or more if you need it) of white rum. Add in club soda to fill the glass.
5. Stir, drink, repeat as necessary.

Simple Syrup
In a small saucepan, combine one cup sugar and one cup water. Cook over medium heat until the sugar is completely dissolved. No need to boil. Remove from heat and refrigerate syrup until ready to use.

Maan's Tomato and Green Bean Recipe

I've posted the recipe for the tomato and green bean dish I brought to the potluck on Sunday on PopcornHomestead, but I'm also republishing here so those who want it can get their hands on it. It was even better the next day. Enjoy!

Maan makes this dish with fresh green beans and tomatoes, and lots and lots of garlic. It is, of course, best when all the ingredients are fresh and brought over from Frog Holler Organic Farm down the way. I used my canned beans and tomatoes, and lots and lots of garlic. (While the rest of America might be slowly turning into corn, Maan is quite possibly turning into garlic and thankfully taking us with him.)

Maan's Green Beans (offered with permission)
2 quarts canned tomatoes
4 pints canned green beans (hold back the juice)
Medium onion, chopped
Two heads of garlic, peeled*
2 small cans of tomato paste
Salt
Olive oil
*Maan has left the garlic unpeeled in the past making for a fun exercise while eating this dish.

Saute the onions in olive oil until they are very brown, nearly carmelized. And use a generous amount of olive oil to do so. Then plop in the tomatoes and tomato paste, the beans, the garlic, and the salt. Bring it to a boil, then reduce to a simmer. Salt to taste. When the beans are fresh, simmer until they are well done. When the beans are canned, simmer until the garlic is soft and you can't wait anymore. I left it for about five hours, but it was even better the next day after more time sitting. If you make it early in the day it could be perfect for an evening meal. Best if eaten with fresh pita bread, but tasty on its own or served over rice.

Sunday, January 25, 2009

Summer Roll Pie

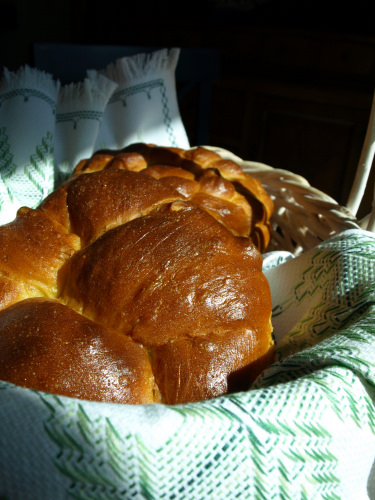
My intended submission to the MLFB pie challenge was an adaption of this Five-Spice Apple Quince pie recipe from Epicurious. I wanted to make it into mini pies with a new crust recipe I'm working on that is partially whole wheat. That plan fell flat when I found my stored quince were becoming mealy. I went ahead and used them anyway but I was further disappointed that the quince flavor completely overwhelmed the amount of spice called for in the original recipe. Even when I doubled the spice, it wasn't noticeable. The resulting hand pies were edible but nothing special. So I went in an entirely different direction...

In my food blog browsing, I saw a recipe for a Vietnamese-inspired summer roll salad. Experimenting with this recipe seemed like a great idea for our "Summer in January" get together. I've made summer rolls several times and love them but making them is a labor intensive process. The pie version is more like a rice paper decorated salad. I liked that I could keep the same flavors as a summer roll with a lot less work. It felt like tapping my inner Sandra Lee, an amusing change of pace for me. To warn you, this recipe is definitely still a work in progress. I think there might be a better vegetable combination and the tofu could easily be substituted with shrimp or other protein. For a vegan version, you could season the vinegar or lime juice with a little sugar and salt and eliminate the fish sauce. Here's what I did for Saturday's get together.

Vegetable Summer Roll Pie
Inspired by Hey what's for dinner mom?
Makes enough for 10-12 servings, fills a 10-inch deep dish pie plate

9-10 6-inch rice papers, less if using larger papers
1 jicama, about the size of two fists together
2 medium carrots
1 1/2 cups snow peas
10 ounces of firm fresh tofu
3 tablespoons rice vinegar (If I had it I would have used lime juice instead.)
1-2 teaspoons fish sauce, to taste (nam-pla or nuoc-mam)
a small bunch of mint, washed and dried
spray oil (I really like Spectrum grape seed oil spray. It gives the cleanest taste.)
cashew butter sauce (recipe follows)

-Trim, peel and finely julienne the jicama and carrots, I used a mandoline. Trim the stem ends from the snow peas, stack and thinly slice on the bias. Thinly slice (chiffonade) some of the mint to get ~2 tablespoons of sliced mint. Set aside the vegetables and mint in separate piles.
-Slice the tofu into 1/4 inch slabs. Heat a skillet or griddle. After the griddle is hot, spray with oil and lay the tofu in a single layer. Lightly brown the tofu on both sides then remove.
-Bring out your pie plate and fill another pie plate (or large bowl) with a inch or two of hot water. One by one soften the rice papers in the hot water and cover the bottom of the pie plate. I worked in an overlapping flower pattern and used 5 papers to line the bottom of the dish.
-In a large bowl, stir together the vinegar (or lime juice) and fish sauce. Toss the jicama in this dressing and remove, giving a little shake to remove excess dressing. Place the jicama in a layer in the lined pie plate and sprinkle evenly with the sliced mint.
-Toss the carrots in the fish sauce dressing and again remove shaking off excess dressing. Place the carrots in a layer on top of the mint and jicama.
-Place the sliced snow peas as the final vegetable layer. I would suggest not dressing them because they are more likely to get soggy and limp. I only dressed the jicama and carrots.
-Cut the cooked slabs of tofu into halves or quarters and spread a small amount of cashew sauce on one side. Place the sauce side down in a layer in the pie. Get as decorative as you'd like, this is the part that will show through the top rice paper.
-When all the tofu is placed, lay whole mint leaves over the top. Use as many as you'd like.
-Soften a sheet of rice paper and carefully place it over the center of the pie. Soften more sheets, cut them in half and cover the edges, rolling the edges from the bottom layer of rice paper together with the top layer pieces until the top is covered.
-Chill until serving then slice into wedges and serve with additional cashew sauce on the side.

Cashew Butter Sauce
My slight changes to this recipe from Steamy Kitchen
Makes ~3/4 cup

2 teaspoons neutral oil
3 cloves garlic, finely grated or pressed (a microplane is great for this)
1/2 to 1 whole Thai bird chile, seeded and finely minced
1/4 cup hoisin sauce
4 tablespoons roasted cashew butter
a splash of fish sauce
1/4-1/3 cup water

-Cook the garlic and chile in the oil until fragrant.
-Add the hoisin, cashew butter and fish sauce to the garlic oil. Stir over low heat, the warmth will soften the fats in the cashew butter and help it incorporate easier.
-Add enough water to make a thick mayonnaise consistency. Taste for seasoning and add more fish sauce for salt and more chile for more heat.
-Store extra sauce in a jar in the refrigerator.

*Random pie related link If you were the baker would this bother you?