I've long been a fan of Mark Bittman. D wanted to "learn" cooking some time ago and I got him Bittman's How to Cook Everything for his birthday. D hasn't used it much, but I have. Constantly.
The one area where he leaves me somewhat cold is baking. I haven't had the best success with his various baking recipes, so when his "No-Knead Bread" was tearing up the internet, I was skeptical.
I also often don't have the planning time to put dough in the fridge for a day or two. I wanted something where my boys could eat bread and then I could make some more. Quickly.
Well, another issue I had with it was it called for a dutch oven, and I believed I needed a cast iron dutch oven, which is something I don't own. A more savvy friend told me, however, that an enameled dutch oven was just fine, as long as the cast iron was underneath. It was. And a love affair was born.
The gorgeous photo will have to wait for later, as I forgot to take pictures with my last loaf, and my current loaf is rising as I write this.
Suffice it to say that we now have gorgeous loaves of tangy, artisan bread for a mere $1.67 for 16 BIG slices. Suffice it to say, I couldn't be happier.
Want in on the goodness? Go here (and you can also find the gorgeous photos that I didn't supply this week).
NOTE: Do NOT try the whole wheat recipe - it doesn't seem to work that well. I'm still working on a no-knead recipe for decent whole wheat bread - if you have any ideas, please let me know.
Happy Wednesday!
Oh... and for my calorie-counting friends, here's the nutritional info, provided by sparkrecipes.com:
Fat: 1.1g
Carbohydrates: 18.1g
Calories:94.2
Protein: 2.6g
A serving = 1/16th of the loaf. It's a decent sized serving.
Wednesday, January 28, 2009
Monday, January 26, 2009
Mojito

1. Squeeze the juice of three lime slices into a glass. Drop slices into glass as well.
2. Add 7-9 fresh mint leaves and one ounce of simple syrup (recipe follows).
3. Using a muddler, give the mint leaves and the lime slices a few good smashes and twists.
4. Add crushed ice to the glass, filling 3/4 of the way to the top. Pour in one ounce (or more if you need it) of white rum. Add in club soda to fill the glass.
5. Stir, drink, repeat as necessary.
Simple Syrup
In a small saucepan, combine one cup sugar and one cup water. Cook over medium heat until the sugar is completely dissolved. No need to boil. Remove from heat and refrigerate syrup until ready to use.
Maan's Tomato and Green Bean Recipe
I've posted the recipe for the tomato and green bean dish I brought to the potluck on Sunday on PopcornHomestead, but I'm also republishing here so those who want it can get their hands on it. It was even better the next day. Enjoy!
Maan makes this dish with fresh green beans and tomatoes, and lots and lots of garlic. It is, of course, best when all the ingredients are fresh and brought over from Frog Holler Organic Farm down the way. I used my canned beans and tomatoes, and lots and lots of garlic. (While the rest of America might be slowly turning into corn, Maan is quite possibly turning into garlic and thankfully taking us with him.)
Maan's Green Beans (offered with permission)
2 quarts canned tomatoes
4 pints canned green beans (hold back the juice)
Medium onion, chopped
Two heads of garlic, peeled*
2 small cans of tomato paste
Salt
Olive oil
*Maan has left the garlic unpeeled in the past making for a fun exercise while eating this dish.
Saute the onions in olive oil until they are very brown, nearly carmelized. And use a generous amount of olive oil to do so. Then plop in the tomatoes and tomato paste, the beans, the garlic, and the salt. Bring it to a boil, then reduce to a simmer. Salt to taste. When the beans are fresh, simmer until they are well done. When the beans are canned, simmer until the garlic is soft and you can't wait anymore. I left it for about five hours, but it was even better the next day after more time sitting. If you make it early in the day it could be perfect for an evening meal. Best if eaten with fresh pita bread, but tasty on its own or served over rice.
Sunday, January 25, 2009
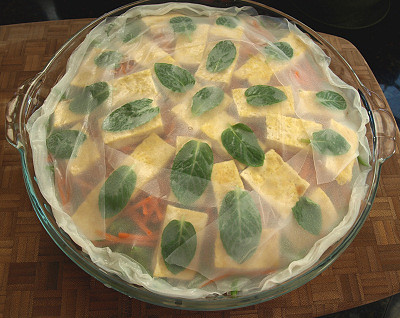
Summer Roll Pie
 My intended submission to the MLFB pie challenge was an adaption of this Five-Spice Apple Quince pie recipe from Epicurious. I wanted to make it into mini pies with a new crust recipe I'm working on that is partially whole wheat. That plan fell flat when I found my stored quince were becoming mealy. I went ahead and used them anyway but I was further disappointed that the quince flavor completely overwhelmed the amount of spice called for in the original recipe. Even when I doubled the spice, it wasn't noticeable. The resulting hand pies were edible but nothing special. So I went in an entirely different direction...
In my food blog browsing, I saw a recipe for a Vietnamese-inspired summer roll salad. Experimenting with this recipe seemed like a great idea for our "Summer in January" get together. I've made summer rolls several times and love them but making them is a labor intensive process. The pie version is more like a rice paper decorated salad. I liked that I could keep the same flavors as a summer roll with a lot less work. It felt like tapping my inner Sandra Lee, an amusing change of pace for me. To warn you, this recipe is definitely still a work in progress. I think there might be a better vegetable combination and the tofu could easily be substituted with shrimp or other protein. For a vegan version, you could season the vinegar or lime juice with a little sugar and salt and eliminate the fish sauce. Here's what I did for Saturday's get together.
Vegetable Summer Roll Pie
Inspired by Hey what's for dinner mom?
Makes enough for 10-12 servings, fills a 10-inch deep dish pie plate
9-10 6-inch rice papers, less if using larger papers
1 jicama, about the size of two fists together
2 medium carrots
1 1/2 cups snow peas
10 ounces of firm fresh tofu
3 tablespoons rice vinegar (If I had it I would have used lime juice instead.)
1-2 teaspoons fish sauce, to taste (nam-pla or nuoc-mam)
a small bunch of mint, washed and dried
spray oil (I really like Spectrum grape seed oil spray. It gives the cleanest taste.)
cashew butter sauce (recipe follows)
-Trim, peel and finely julienne the jicama and carrots, I used a mandoline. Trim the stem ends from the snow peas, stack and thinly slice on the bias. Thinly slice (chiffonade) some of the mint to get ~2 tablespoons of sliced mint. Set aside the vegetables and mint in separate piles.
-Slice the tofu into 1/4 inch slabs. Heat a skillet or griddle. After the griddle is hot, spray with oil and lay the tofu in a single layer. Lightly brown the tofu on both sides then remove.
-Bring out your pie plate and fill another pie plate (or large bowl) with a inch or two of hot water. One by one soften the rice papers in the hot water and cover the bottom of the pie plate. I worked in an overlapping flower pattern and used 5 papers to line the bottom of the dish.
-In a large bowl, stir together the vinegar (or lime juice) and fish sauce. Toss the jicama in this dressing and remove, giving a little shake to remove excess dressing. Place the jicama in a layer in the lined pie plate and sprinkle evenly with the sliced mint.
-Toss the carrots in the fish sauce dressing and again remove shaking off excess dressing. Place the carrots in a layer on top of the mint and jicama.
-Place the sliced snow peas as the final vegetable layer. I would suggest not dressing them because they are more likely to get soggy and limp. I only dressed the jicama and carrots.
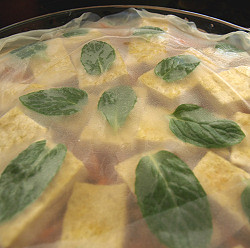
-Cut the cooked slabs of tofu into halves or quarters and spread a small amount of cashew sauce on one side. Place the sauce side down in a layer in the pie. Get as decorative as you'd like, this is the part that will show through the top rice paper.
-When all the tofu is placed, lay whole mint leaves over the top. Use as many as you'd like.
-Soften a sheet of rice paper and carefully place it over the center of the pie. Soften more sheets, cut them in half and cover the edges, rolling the edges from the bottom layer of rice paper together with the top layer pieces until the top is covered.
-Chill until serving then slice into wedges and serve with additional cashew sauce on the side.
Cashew Butter Sauce
My slight changes to this recipe from Steamy Kitchen
Makes ~3/4 cup
2 teaspoons neutral oil
3 cloves garlic, finely grated or pressed (a microplane is great for this)
1/2 to 1 whole Thai bird chile, seeded and finely minced
1/4 cup hoisin sauce
4 tablespoons roasted cashew butter
a splash of fish sauce
1/4-1/3 cup water
-Cook the garlic and chile in the oil until fragrant.
-Add the hoisin, cashew butter and fish sauce to the garlic oil. Stir over low heat, the warmth will soften the fats in the cashew butter and help it incorporate easier.
-Add enough water to make a thick mayonnaise consistency. Taste for seasoning and add more fish sauce for salt and more chile for more heat.
-Store extra sauce in a jar in the refrigerator.
*Random pie related link If you were the baker would this bother you?
Thursday, January 22, 2009
Pizza Pie

I love pizza—so much, in fact, that we either make it or buy it once a week. It’s such a great choice for busy nights when you come home exhausted and just want to crack open a beer, slip into your pajamas and unwind in front of the television until bedtime.
Pizza pie is also our meal of choice for “first dates” with new friends. In my humble opinion, first date dinners are never the time to break out things like lentils, clams, curries, etc…foods/flavors that may or may not go over with people you don’t know all that well. I always aim to make two small pizzas, asking our friends to bring over a few of their favorite toppings for the first pizza. The second pie is my planned experiment—with combinations they may never have tried before.
This is one of our new favorites.
Pizza Pie with Herbed Ricotta and Mushrooms
One recipe, pizza crust (Joy of Cooking’s recipe is my personal choice), which makes two pizza pies.
1 cup (2 ounces) shredded asiago cheese (or parmesan)
2/3 cup part-skim ricotta cheese
1 small clove garlic, minced
1T minced parsley, basil, and/or oregano (or 1 tsp dried Italian seasoning), in the proportions you like
One package white button mushrooms, cleaned and thinly sliced
Salt and Pepper
Flour, cornmeal for dusting
1. Preheat oven to 475 ° F. (If using a pizza stone—recommended—oil stone and preheat it in oven as oven comes to temperature…30 minutes or so)
2. Mix together in a small bowl: ricotta cheese, garlic, herbs, a pinch of salt and a few good grinds of black pepper. Set mixture aside.
3. Once oven and stone are preheated, take one ball of dough and flatten. Work on a floured surface to create a round(ish) 12” form. My pizzas are never round—why should they be? I say it makes them more, um, “artisan”…right?
4. Remove hot pizza stone from oven, scatter a bit of cornmeal on the stone, then transfer the dough to the stone. Brush dough with olive oil and pop into the oven. Par-bake until the dough is set but not browned. (Dough will start to bubble up as well…this takes about 6 minutes.)
5. Once par-baked, remove from oven and top the pizza with herbed ricotta, mushrooms, and asiago cheese. Finish baking, until crust is browned and cheese is bubbly throughout, about 8 minutes.
Saturday, January 17, 2009
Pie!
I cannot make or eat pie because the fuckers gals over at Weight Watchers have me on 1400 calories a day and a piece of pie is like 7000 calories and so I couldn't eat the rest of the week. BUT, I can still post my pie crust recipe because posting on a blog burns about 16 calories, or so they say.
Adapted from Heirloom Baking with the Brass Sisters.
Sheila's Pie Crust (makes dough for 1 double crust 9" pie or 2 single crust 8" pies)
2.5 cups flour
1/3 cup sugar
1/4 t salt
1 c cold butter, cut into 1/2 inch dice
1/4 cup ice water
To make the pastry, place the flour, sugar and salt in the bowl of a food processor fitted with a metal blade. Pulse a few times to mix. Add butter and pulse until crumbly. Add water. Pulse until the mixture "comes together, right now, over me".
Remove the dough from the processor, divide in half and shape each half into a disk. Roll it out. Put in pie pan and bake pie according to directions.
I won't get into how to put this into a pie pan, as I kind of use the "roll out and pray" method. If it doesn't quite make it, I just put the pieces into the pie pan in sort of a haphazard way. It still tastes delicious.
If you have extra crust, put some butter and cinnamon on it and roll it up. Bake alongside the pies for a lovely little treat.
Thursday, January 15, 2009
Christmas Cookies - Date Pinwheels
 Christmas is finally packed up, so before I file away my recipe cards again, I am finally posting the cookie recipe I brought to our cookie exchange. These date pinwheel cookies have been a special part of our family holiday for as long as I can remember. My mother got the recipe from my dad's Aunt Ruth. They are "effort cookies" as I need 2 days to get them made.
Filling:
1/2 cup sugar
3/4 cup water
1/2 cup ground walnuts
1 package (7-1/2 ounce) pitted dates, cut small
Boil all together until thick. Set aside and cool.
Note: I have often added more walnuts or more dates to the filling with a smidge more water.
Dough:
1 cup unsalted butter
2 cups brown sugar
3 eggs
4 cups flour (I use 2 cups white all-purpose flour and 2 cups white whole wheat flour)
1 teaspoon baking soda
1/2 teaspoon cinnamon
1/2 teaspoon salt
Cream butter and sugar with a mixer in a large bowl, then add eggs one by one, beating until well mixed. In separate bowl, mix flour, soda, cinnamon, and salt. Whisk to mix well. Slowly add the flour mixture into the butter mixture, mixing well after each addition.
Divide dough into four parts. Roll out each piece of dough using a rolling pin between two large pieces of wax paper. I roll out the dough to be just less than the length of a cookie sheet and maybe 7-8 inches wide. I would guess that the dough is about 1/8 inch in thickness. I do a lot of "cut and paste" to get the dough fairly even all around the edges. Take off top piece of wax paper, spread 1/4 of the date filling as evenly as possible on the dough. Then roll up the dough starting on the long side nearest to you, rolling away from you. Even out the ends of the dough with your hands then wrap the roll in wax paper and freeze overnight on a cookie sheet or anything flat to keep the dough from bending. This recipe makes 4 rolls of cookie dough.
When ready to bake, unroll the dough from the wax paper, cut into slices ~1/4 inch in width, then place on ungreased cookie sheets. I bake these on parchment paper at 375 for 10-12 minutes. I do shift the trays in the oven to keep the cookies from burning on the bottom. We do eat any "black-bottom" cookies but never give those away.
This recipe easily makes 80-100 cookies. Yum, yum, yum. Every one with a Christmas stocking at our house (except our dog) gets a small private stash in their stocking. It's almost impossible to just eat one!
The Quest for Black Bottom Pie
I grew up in the South so was fed a steady diet of meringue-topped pies, usually custard of some type with lightly browned meringue on top. I loved them all, lemon, chocolate, banana cream of course. But one day in a cafeteria in Oklahoma City I had a pie that became my picture of the ideal pie - a black bottom pie. It had an intensely chocolate layer topped by a light creamy layer and I thought it was the best thing I ever had. Trouble was, we didn't have the recipe.
About a year ago I thought again of this mirage and went on a quest to find the real black bottom pie. I read that this is a Southern specialty that has its own myths around it, though it is thought to have originated with a hotel in Louisiana. Many stories and recipes exist. I liked the one about the math professor in a conservative Christian college whose secret recipe for the pie he always brought was never divulged until after his death, because of the rum used in the recipe. Marjorie Rawlings, in Cross Creek Cookery (a bible of authentic Southern cooking from 1942), declared, "I hope to be propped up on my dying bed and fed a generous portion. Then I think that I should refuse outright to die, because life would be too good to relinquish."
I combined what I considered to be the most authentic and also the most tasty aspects of several recipes, including one from a restaurant in Oklahoma City that was probably the progenitor of my Eureka pie. A couple of notes: I consider the ginger snap crust to be essential. There are recipes out there using baked pie crusts, graham cracker crusts, chocolate cookie or even (horrors) Oreo crusts, and from Martha Stewart one using French pastry (pâté brisée) crust. Trust me. Use ginger snaps. Also, the darker and denser the chocolate you use for the bottom layer, the better. Also, this contains raw egg whites, so use precautions and skip this recipe if that concerns you.
Crust: Roll 8 oz of ginger snaps until crushed. Should make 1 ½ cups of crumbs. Mix with 5 T melted butter. Pat into a 9 inch pie pan. Bake 10 min at 300° F. Cool.
Custard:
Separate 4 eggs. Beat the yolks.
Scald 2 cups milk in a double boiler. Stir in egg yolks slowly. Add ½ cup sugar and 1 ½ t cornstarch. Cook with stirring till thick. Remove from heat. Remove 1 cup and keep separate.
Chocolate layer: Melt 2 squares of good unsweetened chocolate (the denser the better) and mix with the 1 cup of reserved custard. Add 1 t vanilla to the cooled custard and pour carefully into the gingersnap crust.
Meringue layer: Blend 1 envelope (or 1 T) gelatin with 4 T cold water. Mix with remaining hot custard.
Beat 4 egg whites until nearly stiff, then gradually beat in ½ c sugar mixed with ¼ t cream of tartar. Add 2 T rum. Mix carefully into cooled custard/gelatin mixture. Tip into crust over chocolate layer. Chill.
Top: Shortly before serving, Beat 1 cup heavy cream until it stands up in peaks. Add 1 T confectioner’s sugar. Cover custard with cream and use a spoon to coax it into peaks. Grate semisweet chocolate over the top, but not to cover, only to ornament.
And yes, I did make this and it was delicious. I can't do it again without 7 people to share it with, though. Did it satisfy my fantasy? Since I no longer have 15-year-old tastebuds, I'm afraid my response was more analytical than paradisical. But it did seem to match my memory.
About a year ago I thought again of this mirage and went on a quest to find the real black bottom pie. I read that this is a Southern specialty that has its own myths around it, though it is thought to have originated with a hotel in Louisiana. Many stories and recipes exist. I liked the one about the math professor in a conservative Christian college whose secret recipe for the pie he always brought was never divulged until after his death, because of the rum used in the recipe. Marjorie Rawlings, in Cross Creek Cookery (a bible of authentic Southern cooking from 1942), declared, "I hope to be propped up on my dying bed and fed a generous portion. Then I think that I should refuse outright to die, because life would be too good to relinquish."
I combined what I considered to be the most authentic and also the most tasty aspects of several recipes, including one from a restaurant in Oklahoma City that was probably the progenitor of my Eureka pie. A couple of notes: I consider the ginger snap crust to be essential. There are recipes out there using baked pie crusts, graham cracker crusts, chocolate cookie or even (horrors) Oreo crusts, and from Martha Stewart one using French pastry (pâté brisée) crust. Trust me. Use ginger snaps. Also, the darker and denser the chocolate you use for the bottom layer, the better. Also, this contains raw egg whites, so use precautions and skip this recipe if that concerns you.
Black Bottom Pie
Crust: Roll 8 oz of ginger snaps until crushed. Should make 1 ½ cups of crumbs. Mix with 5 T melted butter. Pat into a 9 inch pie pan. Bake 10 min at 300° F. Cool.
Custard:
Separate 4 eggs. Beat the yolks.
Scald 2 cups milk in a double boiler. Stir in egg yolks slowly. Add ½ cup sugar and 1 ½ t cornstarch. Cook with stirring till thick. Remove from heat. Remove 1 cup and keep separate.
Chocolate layer: Melt 2 squares of good unsweetened chocolate (the denser the better) and mix with the 1 cup of reserved custard. Add 1 t vanilla to the cooled custard and pour carefully into the gingersnap crust.
Meringue layer: Blend 1 envelope (or 1 T) gelatin with 4 T cold water. Mix with remaining hot custard.
Beat 4 egg whites until nearly stiff, then gradually beat in ½ c sugar mixed with ¼ t cream of tartar. Add 2 T rum. Mix carefully into cooled custard/gelatin mixture. Tip into crust over chocolate layer. Chill.
Top: Shortly before serving, Beat 1 cup heavy cream until it stands up in peaks. Add 1 T confectioner’s sugar. Cover custard with cream and use a spoon to coax it into peaks. Grate semisweet chocolate over the top, but not to cover, only to ornament.
And yes, I did make this and it was delicious. I can't do it again without 7 people to share it with, though. Did it satisfy my fantasy? Since I no longer have 15-year-old tastebuds, I'm afraid my response was more analytical than paradisical. But it did seem to match my memory.
Tuesday, January 13, 2009
Our First Michigan Lady Food Blogger Challenge is: PIE
Because pie holds an important place in bringing us together as families, neighbors, and even as a nation, I hope anyone who is interested will accept the challenge to bake, share and enjoy a pie this month. Sweet, savory, and "creative" pies are included in this challenge. To accept this pie challenge, please post a recipe, your favorite historical pie fact, and if possible, a photo of your creation. For extra credit, make 2 pies and give one to someone deserving.
In promoting National Pie Day on January 23rd, the National Pie Council says "this is a perfect opportunity to pass on the love and enjoyment of pie eating and pie making to future generations." Since the end of our ability to make and share a warm homemade pie will surely mean the end of civilization as we know it, let us do our utmost to create the world as it should be - a world replete with homemade pie.
New York Times 1902
"It is utterly insufficient (to eat pie only twice per week), as anyone who knows the secret of our strength as a nation and the foundation of our industrial supremacy must admit. Pie is the American synonym of prosperity, and its varying contents the calendar of the changing seasons. Pie is the food of the heroic. No pie-eating people can ever be permanently vanquished."Monday, January 12, 2009
Homemade Ketchup

I saw this in my most recent issue of Saveur and decided, what the heck, why not give it a try? It turned out wonderfully and I believe I might be making all my own ketchup from now on...
Ingredients:
- 4 whole cloves
- 1 bay leaf
- 1 cinnamon stick
- 1/4 tsp celery seeds
- 1/4 tsp chile flakes
- 1/4 tsp whole allspice (about 6-7 pieces)
- 2 lbs tomatoes, roughly chopped
- 1 1/2 tsp kosher salt
- 1/2 cup white vinegar
- 5 tbsp brown sugar
- 1 onion, chopped
- 1 anaheim chile, chopped
- 1 clove garlic
Sunday, January 11, 2009
MEAT! Berry glazed loaves
After reading MK's blog entry on the subject, I decided to post my favorite meatloaf recipe. It's from the red and white checkered Better Homes & Gardens cookbook that Jeff brought into our marriage, but I modified it quite a bit.
The recipe is written in paragraph form rather than listing the ingredients first, and I apologize if it's hard to read. This is an easier format for me, though.
Combine 1 lb. of ground beef, 1/3 cup breadcrumbs, 1/3 cup milk, 1 beaten egg, 2 T chopped onions, 1 t each of salt and pepper. I also squirt some ketchup in...just enough to look right to me. Mix with your hands and then shape into individual loaves (I usually get about 4). Put into a baking dish.
Next, combine 1 lb. jar of cranberry sauce***, 1/3 c of brown sugar and 1 T lemon juice. Spoon over the loaves.
Bake at 350 for about 45 minutes (or an hour, if you are my oven), basting once or twice with the glaze.
***I use leftover cranberries from Thanksgiving. Basically, you put cranberries, sugar and water in a crock pot and let it cook for about 3 hours on Tgiving. Put the leftovers in a plastic baggie and freeze it to use later, like in this recipe!! I have used the canned stuff (complete with the little dents from the can), and it is okay, but I think the homemade stuff is much better!
Teacakes
These cookies have been a part of my holiday season all of my life. They are filled with fond memories.

1 Cup Room Temperature Butter
1/2 cup powdered sugar, sifted2 teaspoons vanilla extract
2 1/4 cup flour (I wonder how these would be if I used Cake flour? Guess I will have to try it next year)1/2 teaspoon salt
1 cup toasted, chopped pecanPowdered Sugar for dusting
In a large bowl, cream butter, powdered sugar, and vanilla until light and fluffy. Sift in flour and salt; stir until well mixed. Mix in nuts. Refrigerate 1 hour.
Preheat oven to 400 degrees.
Roll dough into 1-inch balls. Place onto cookie sheets. Bake 10 to 12 minutes or until set but not brown. Remove from oven and cool slightly on wire racks. While cookies are baking place the powdered sugar in a shallow dish. Roll the warm cookies in the powdered sugar, let them cool and roll in sugar again.
I originally posted this recipe on Fruitcake or Nuts on December 29th 2007.
Subscribe to:
Posts (Atom)